
The Midnight Ninja Walk That Broke My Sanity
I remember exactly when I decided I could not take the noise anymore. It was two in the morning, and I was trying to sneak back to my bedroom after grabbing a glass of water from the kitchen.
I took one single step into the hallway, and the hardwood floor beneath me let out a massive, high-pitched screech. My heart dropped instantly as I heard my sleeping toddler start crying in the next room, completely startled by the sudden noise.
For months, I had been memorizing the exact layout of my hallway just to avoid the "noisy spots" on the floor. I literally felt like a ninja in my own home, awkwardly stretching my legs to step over specific planks just to keep the peace.
Living with squeaky floors feels like your house is constantly betraying you. You can never truly relax when every single step you take sounds like you are walking through an old, abandoned pirate ship.
The worst part is the constant anxiety it creates when you have guests over or when you are trying to let your family sleep. You find yourself apologizing for the noise, feeling embarrassed about a problem that seems impossible to fix.
Most people just accept this annoying fate because they believe the only solution is completely tearing up their expensive flooring. The thought of hiring a contractor to rip out beautiful oak boards, expose the subfloor, and create a massive dusty mess is terrifying.
It feels like choosing between endless noise or an incredibly expensive, disruptive construction project in the middle of your living space. But after losing sleep for the hundredth time, I started digging deep into professional carpentry forums and talking to old-school builders.
I discovered that you absolutely do not need to tear up your house to get total silence. There is a specific, hidden technique that lets you fix the core issue directly from the top, without leaving any ugly marks. Let me show you exactly how to reclaim the peace and quiet in your home.
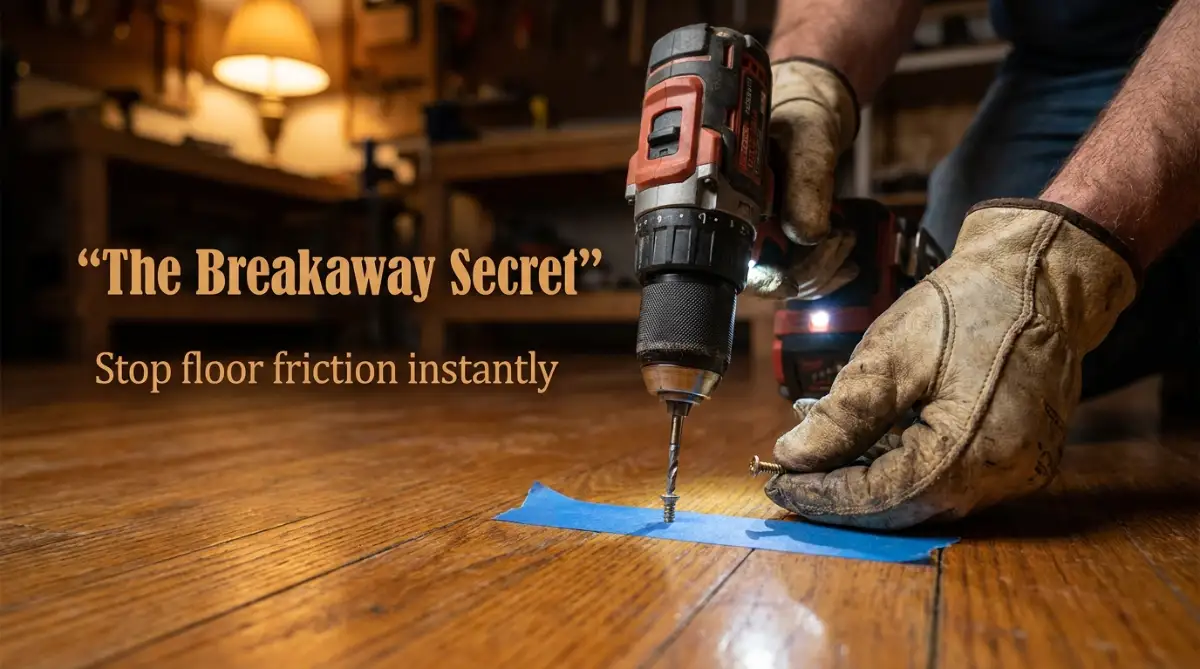
Decoding the Anatomy of a Noisy Floorboard
Before you can permanently silence a floor, you have to understand exactly why it is screaming in the first place. Wood is not a dead material; it actually breathes, moves, and reacts to the environment inside your home.
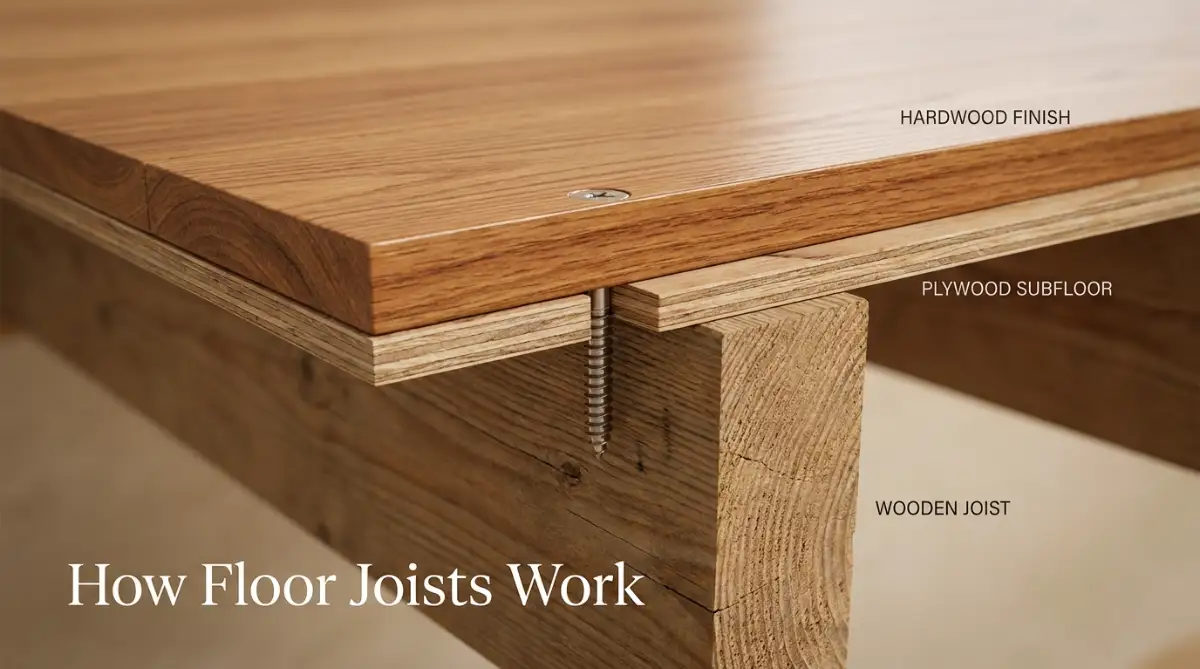
When your house was first built, the construction crew laid down thick wooden beams called joists to support the house. On top of those joists, they nailed down a rough layer of wood called the subfloor, and finally, your pretty hardwood went on top.
When everything is tight and secure, walking across the room is completely silent. But over the years, gravity, weight, and changes in indoor humidity cause those layers of wood to dry out and shrink slightly.
The Hidden Friction Trap
When the wood shrinks, tiny microscopic gaps form between the top hardwood layer, the subfloor, and the joists below. Now, when you step on that specific spot, your body weight pushes the wood down into that tiny empty space.
As the wood bends under your foot, it aggressively rubs against the metal nails holding it in place. That loud, annoying squeak you hear is literally just the sound of dry wood scraping up and down against a metal nail shaft.
Think of it like opening a heavy wooden door with rusty hinges that have lost all their oil. The friction between the moving parts creates a vibration, and that vibration travels through the air as a high-pitched squeak.
To stop the noise, we have to stop the friction, and we do that by locking those layers of wood back together so they can no longer move.
The Zero-Demolition Action Plan
You do not need heavy machinery to solve this puzzle. You just need a bit of patience and a very specific strategy to find the exact spot where the wood is moving.
Locating the Invisible Enemy
Your first mission is to map out the exact location of the squeak. You cannot just guess where the noise is coming from because sound travels very strangely through solid wood.
Take off your shoes and walk around the noisy area in your socks. You want to feel the floor just as much as you hear it.
Step very slowly and shift your weight back and forth over the suspected area. You are looking for the exact plank that physically dips down or moves when you put your full body weight on it.
Once you find the exact spot that triggers the loud creak, mark it with a small piece of blue painter's tape. Do not use standard masking tape or duct tape, as they can leave a sticky residue that ruins your shiny floor finish.
The Short-Term Dry Lubrication Trick
If you have a party tonight and just need a quick, temporary fix, you can actually use science to your advantage without using any tools. Remember how we said the squeak is caused by friction between the wood boards?
You can temporarily eliminate that friction by forcing a dry lubricant down into the tiny cracks between the hardwood planks. Grab a bottle of standard baby powder, talcum powder, or even powdered graphite from the hardware store.
Sprinkle a generous amount of the powder directly over the seams of the noisy boards you marked earlier. Then, put a clean rag over your foot and gently rub the powder deep into the cracks.
Walk over the spot a few times to force the powder down into the invisible gaps where the wood is rubbing together. Finally, use a damp cloth to wipe away the excess powder from the surface so nobody slips and falls.
This powder acts like microscopic ball bearings, allowing the wood boards to slide past each other silently instead of violently scraping. However, this is only a temporary bandage; the powder will eventually get vacuumed up or settle deeper, and the squeak will return.
The Permanent Solution: The Breakaway Technique
To get rid of the noise forever, you have to completely eliminate the movement between the hardwood and the subfloor. To do this from above without ruining your floor, professionals use a genius invention called a "breakaway screw" or a "counter-snap screw."
These are highly specialized screws that are purposely designed to snap in half once they are fully driven into the wood. They allow you to pull the floor tight, and then the head of the screw breaks off below the surface, making the repair completely invisible.
Here is exactly how this magic trick works.
First, you need to find the floor joist directly under the squeaky spot. The joist is the thick wooden beam that provides the main structural support, and anchoring your screw into it gives you the strongest possible hold.
If you just screw the hardwood to the thin subfloor, the fix might easily pull loose again after a few months of heavy foot traffic. You can usually locate a joist by knocking gently on the floor; a hollow sound means empty space, while a solid thud means you found the beam.
Alternatively, look very closely at the existing nails in your floorboards. Builders always drive their nails directly into the joists, so finding a straight line of old nails gives you a perfect map of where the beams run.
Executing the Perfect Anchor
Once you know exactly where the joist is, it is time to use the breakaway screw system. These kits usually come with a special metal alignment fixture that controls exactly how deep the screw goes.
Place the metal fixture directly over the squeaky board, right above the hidden joist. Put the breakaway screw into the fixture and slowly drive it down using a standard cordless power drill.
I actually learned a tough lesson about using power tools during my first attempt at fixing my hallway. I got too confident, pulled the drill trigger way too fast, and ended up stripping the screw head completely smooth. Always use a very slow, steady speed on your drill so the bit stays firmly locked into the screw head without slipping.
Watch this quick demonstration to see exactly how professionals snap these screws flawlessly.
As the screw goes deep into the joist, you will physically feel the hardwood board being pulled tightly down against the subfloor. The gap is now completely closed, and the layers of wood are safely locked together.
Once the screw hits the bottom of the metal fixture, the engineered weak point on the screw shaft will suddenly snap with a loud pop. The head of the screw safely breaks off, leaving the rest of the shaft buried securely beneath the surface of your hardwood.
Hiding the Evidence
After the screw head breaks off, you will be left with a tiny hole in your wood floor that is no bigger than a finishing nail. Most people will never even notice it, but you can make it completely vanish with one extra step.
Head to the paint section of any hardware store and look for wood putty or a wax filler pencil that matches your floor's exact color. These wax pencils come in dozens of shades, from light maple to dark mahogany.
Simply rub the wax pencil back and forth over the tiny hole until it is completely filled in and smooth. Take a dry paper towel and buff the spot gently to blend the wax into the surrounding wood grain.
Just like that, you have permanently anchored the loose board, silenced the terrible friction, and hidden the repair completely.
Myth vs. Reality: Understanding Floor Noises
There is a lot of bad advice floating around the internet about home repairs. Let us clear up a few common misunderstandings about noisy floors.
Myth: A squeaky floor means your house is structurally failing and the wood is rotting.
Reality: In almost all cases, a squeak is just a simple matter of seasonal wood shrinkage and a slightly loose nail. It has absolutely nothing to do with the overall safety or structural integrity of your home.
Myth: Spraying WD-40 on the floor will permanently fix the squeak.
Reality: Liquid lubricants will heavily stain your hardwood, ruin the clear coat finish, and attract massive amounts of dirt. Never put liquid oils on a finished interior wood floor under any circumstances.
Myth: You have to put a screw into every single board in the room to make it quiet.
Reality: Usually, an entire noisy area is caused by just one or two loose boards shifting against each other. Pinning down the single worst offender often silences the surrounding boards automatically.
By understanding how your house breathes and moves, you stop being afraid of these common home ownership quirks. You realize that your house is just a giant puzzle, and every puzzle has a logical, straightforward solution.
The Importance of Managing Indoor Climate
If you find yourself chasing new floor squeaks every single month, the real problem might actually be the air inside your home. Hardwood floors act like giant sponges that constantly absorb and release moisture from the surrounding air.
During the cold winter months, we turn our heaters on, which aggressively dries out the indoor air. This lack of humidity causes the wood planks to shrink, creating the exact gaps that lead to terrible friction.
In the summer, the air gets humid again, the wood swells up, and the squeaks might magically disappear on their own. This constant shrinking and swelling cycle eventually loosens the nails permanently.
To protect your floors and prevent new squeaks from developing, you need to stabilize your indoor environment. Keeping your home's humidity level relatively consistent throughout the year is the ultimate preventative maintenance.
Pro-Level Secrets for a Lifetime of Quiet Floors
Now that you understand the basic mechanics of silencing a noisy floorboard, it is time to think like a true professional. Fixing a squeak today is great, but preventing new ones from happening tomorrow is the real goal.
If you want to maintain a completely silent home over the long run, you have to treat the root cause of the problem. Your hardwood floors are essentially living things that constantly react to the environment inside your house.
The biggest secret in the flooring industry is that most squeaks are entirely preventable with proper climate control. Wood acts like a giant, solid sponge that absorbs moisture from the air when it is humid and releases it when it is dry.
When your indoor air gets too dry, the wood cells actually shrink and pull away from the nails holding them down. This constant shrinking is exactly what creates those tiny, noisy gaps between the floor and the joist.
According to the experts at the National Wood Flooring Association, keeping your indoor humidity completely stable is the best way to protect your investment. They recommend keeping your home's relative humidity between thirty and fifty percent all year round.
The Magic of Digital Hygrometers
You cannot manage what you cannot measure, so I highly recommend grabbing a cheap digital hygrometer for your living room. This tiny device sits on your shelf and tells you the exact moisture level in your home's air at a quick glance.
If you notice the humidity dropping into the low twenties during the dry winter months, it is time to take action. Running a simple room humidifier can pump enough moisture back into the air to keep your floorboards swelled tight against their nails.
Just like you would research safe weight loss supplements for women over 40 to protect your health, you need to use safe tools to protect your home's health. Small, daily habits always yield the best long-term results.
The Hidden Basement Trick
Sometimes, you might get lucky and have an unfinished basement directly below your noisy room. If you can actually look up and see the exposed floor joists from underneath, you have access to an amazing pro-level shortcut.
Instead of driving a screw from the top, you can simply tap a small wooden wedge, known as a shim, into the gap between the joist and the subfloor. You just add a drop of carpenter's wood glue to the wedge and gently tap it in with a hammer until it sits snug.
This completely fills the empty space and immediately stops the wood from bending downward when someone walks on it upstairs. Do not hammer the wedge in too hard, or you will accidentally push the hardwood floor up and create a visible bump in your living room.
Protecting Your Wax Repairs
If you used the breakaway screw method and filled the tiny hole with a colored wax pencil, you need to protect that spot. Heavy foot traffic and aggressive mopping can eventually wear that soft wax away over a few months.
To make your repair last forever, take a tiny drop of clear polyurethane floor finish on the tip of a cotton swab. Gently dab it over the wax filled hole and let it dry completely overnight.
This creates a hard, invisible shield over the soft wax, ensuring it never washes away during your weekly cleaning routine. It is a tiny extra step, but it makes an incredible difference in how your floor looks years down the line.
Taking the time to do things right the first time gives you incredible peace of mind. It is very similar to the feeling you get when you finally unlock your dream home low deposit condo mortgages explained because you did your proper research.
When you fully understand how your home works, you stop feeling overwhelmed by minor maintenance issues. You can confidently tackle these small projects before they turn into massive headaches.
The Danger Zone: Floor Repair Disasters to Avoid
While the breakaway screw technique is brilliant and highly effective, it can turn into a complete nightmare if you rush the process. I have seen so many well-meaning homeowners completely ruin their beautiful flooring simply because they skipped a few basic safety checks.
When you get frustrated by a noisy floor, it is very easy to act impulsively and grab whatever tools you have lying around. However, treating your home like a rough construction zone will always lead to expensive mistakes.
You must remember that you are working on a highly finished, decorative surface that everyone in your house looks at every day. Let us walk through the most dangerous pitfalls so you can keep your floors looking absolutely pristine.
The Standard Screw Catastrophe
The absolute worst mistake you can make is trying to use a regular wood screw or a drywall screw to fix a squeak. People often assume that any long piece of metal will do the job, which is a terrible assumption.
Standard screws do not have an engineered breaking point, meaning the ugly metal head will sit right on top of your beautiful oak plank. If you try to force a normal screw deep below the surface without pre-drilling, you will instantly split the hardwood board right down the middle.
Once a floorboard cracks in half, you cannot simply glue it back together and expect it to look normal. You will have to hire a professional to cut that specific board out and weave a brand new piece into the floor, which costs hundreds of dollars.
Using the wrong materials for a job is a silent trap that catches many beginners off guard. It is much like falling into the hidden legal traps that can destroy your new startup overnight because you thought a generic template would be good enough.
Drilling Blindly Into the Unknown
Another massive danger is blindly drilling deep into your floor without verifying exactly what is underneath that specific spot. Floor joists are not just pieces of wood; they are the main highways for your home's hidden utilities.
Plumbers and electricians often drill holes straight through the middle of those wooden joists to run water pipes and electrical wires. If you drive a long metal screw right into a hidden water line, you will have a catastrophic indoor flood on your hands within seconds.
The Department of Energy's guide on home construction strongly advises mapping out your utility lines before attempting any deep structural drilling. Always check your basement or crawlspace to see if there are wires running directly under the squeaky spot you want to fix.
The WD-40 Nightmare
I mentioned dry powder lubricants earlier, but I have to issue a serious warning about liquid oils. Out of sheer desperation, some people will literally spray cans of WD-40 or heavy cooking oil directly onto their noisy hardwood floor seams.
They think the oil will seep down and stop the friction, but they are actually creating a permanent chemical stain in the natural wood grain. The oil destroys the polyurethane clear coat and turns the edges of the planks completely black and greasy.
Once liquid oil soaks deep into the raw wood below the surface, it is almost impossible to remove. You cannot even sand it out because the oil penetrates too deeply, meaning you have to rip out and replace the stained sections entirely.
Mismatched Color Disasters
When it comes time to hide your tiny screw hole, picking the wrong putty color will make the repair look ten times worse than the squeak itself. Many people just grab a generic "brown" wood filler off the hardware store shelf and assume it will blend in.
Hardwood floors have very specific undertones; some oak leans yellow, while cherry wood leans heavily red. If you put a yellow-toned putty into a red-toned floor, the repair will stand out like a sore thumb every time the sunlight hits it.
I always suggest buying three different shades of wax pencils that are very close to your floor color. Test them all on a small, hidden piece of spare wood first so you know exactly which one blends perfectly before touching your living room floor.
Making informed decisions and preparing for the worst-case scenario is a life skill that applies to everything. Whether you are fixing a floor or figuring out how to buy the best travel insurance for pre-existing conditions, taking a few extra minutes to get it right saves you a world of pain later.
Your Master Plan for a Peaceful Home
You now hold the exact blueprint for transforming your noisy, irritating hallways back into a quiet, peaceful sanctuary. You understand why wood moves, how friction creates that terrible sound, and exactly what tools you need to stop it forever.
There is no reason to keep tiptoeing around your own house like a burglar in the middle of the night. You do not have to accept the anxiety of waking up your family just because you wanted a midnight snack.
By taking control of your indoor humidity and carefully anchoring those loose boards, you are actively protecting the value of your property. Every small repair you do yourself builds your confidence and makes you a much more capable homeowner.
The next time you hear a loud creak under your foot, you will not feel that familiar sense of dread or helplessness. Instead, you will know exactly how to map the spot, find the joist, and snap a breakaway screw perfectly into place.
If you want to keep expanding your knowledge on how to manage your life, home, and finances, I always recommend exploring our main hub at Infozonee for more practical guides.
I really hope this guide gives you the courage to finally tackle those annoying floorboards this weekend. Taking just thirty minutes to fix that one terrible squeak completely changed how I feel about walking around my own house, and I know it will do the exact same for you!
Common Questions About Silencing Hardwood Floors
Will the breakaway screw cause my hardwood floor to crack?
No, the breakaway system is specifically engineered to prevent splitting and cracking. The kit includes a specialized alignment fixture that perfectly guides the screw, and the screw itself has a special thread design that easily pulls the wood tight without causing excessive pressure.
Can I use this technique on laminate or engineered floating floors?
You should never use this technique on a floating floor like laminate or click-lock vinyl planks. Floating floors are designed to move and expand freely across the room; if you screw them down to the subfloor, they will buckle and warp heavily when the temperature changes.
What if I absolutely cannot find a floor joist under the squeak?
If the squeak is happening entirely between two joists, you are dealing with a subfloor issue rather than a joist gap. In this case, there are specific breakaway screws designed with a different thread pattern meant only to pull the top hardwood layer directly tight against the plywood subfloor.
Does baby powder make the wood floors dangerous and slippery?
Yes, any dry lubricant like baby powder or graphite will make the surface of your hardwood incredibly slick. If you use the temporary powder trick, you must wipe the top surface completely clean with a damp rag immediately afterward to prevent anyone from slipping and getting hurt.
How many screws do I need to fix one noisy spot?
Usually, driving just one single screw directly into the joist nearest the squeak is enough to silence the whole area. If the board is very long or severely bowed, you might need to place a second screw about six inches away from the first one to hold it completely flat.
Disclaimer: The information provided in this article is for educational and informational purposes only. Home repairs carry inherent risks, and altering structural components can sometimes impact warranties. Always exercise caution, wear proper safety gear, and ensure there are no plumbing or electrical lines beneath your work area before drilling. If you are unsure about your specific flooring type or the structural integrity of your home, please consult with a licensed flooring professional or contractor.